SKIP TO:
CHEXPRESS CX30 | TELLERSCAN TS240 | TELLERSCAN TS500 | BRANCHXPRESS BX7200
SMARTSOURCE PROFESSIONAL / EXPERT | SMARTSOURCE ELITE / EXPERT ELITE | SMARTSOURCE MICRO ELITE |
SMARTSOURCE ADAPTIVE
Before You Start — ScanLite Diagnostic Tool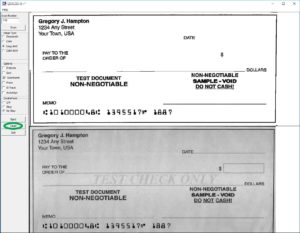
Digital Check has a free utility that can be downloaded from our website and which many teller applications include in their applications called ScanLite. This tool is useful in many different ways from performing diagnostics on the scanner to including a cleaning function (see “Clean” button highlighted in the picture) that turns on the feed rollers, allowing a cleaning card to be fed through without jamming or impacting the capture software application. ScanLite will be referred to in the following descriptions as the tool to use when cleaning a Digital Check scanner. At this time, ScanLite is not compatible with SmartSource scanner models.
CheXpress® CX30
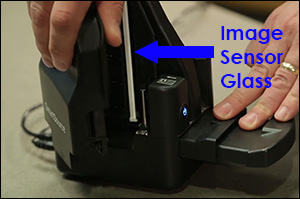
The CX30 single feed scanner is the easiest of Digital Check’s scanners to maintain. This is because the CX30 is a single-feed scanner and therefore is not required to separate items from a large batch loaded into the feeder. Cleaning of this scanner involves two steps. First, perform a periodic inspection of the document track and use a Digital Check cleaning card to clean the scanner rollers. Using a can of compressed air will help keep the document track clean. Inspect the quality of the captured images on a regular basis. If the image quality drops off, clean the image sensor glass by following the procedure below.
 In addition to routine drive roller cleaning, a periodic inspection of the entire document track area is also recommended. The use of a flashlight will enhance the visual inspection in the image sensor section and throughout the document track. Remove any staples, paperclips, debris etc. that might have accumulated during use. Have a can of compressed air available to blow out the document track on a regular basis. Track should be blown out from the back of the track to the front with the cover removed.
To clean the image sensors, use a Digital Check cleaning swab or a clean cloth to wipe the glass. Be careful not to scratch the glass when cleaning or accessing the image sensor for any reason. Make sure that the door of the sensor assembly is tightly closed when finished to prevent image distortion. Simply run a Digital Check scanner cleaning card (PN: IS0033 – available at store.digitalcheck.com) through the scanner eight times when cleaning the drive rollers. If additional cleaning needs to be performed to the rollers, hold a cleaning swab (PN: IS0037) against the rollers while they are running.
For more information, please check the CX30 manual, pages 19-20.
TellerScan® TS240
The TS240 is Digital Check’s best-selling batch-feed scanner and is used in Remote Deposit Capture, Teller Capture, and Branch Back Counter Capture scanning environments. Given the number of items these devices scan in the course of a month and the importance of properly separating items from the batch of checks in the feeder, regular maintenance is critical to reduce jams, as well as to improve image quality and MICR read rates.
Perform a periodic inspection of the document track and use a Digital Check cleaning card to clean the scanner rollers. The use of a flashlight will enhance the visual inspection in the image sensor section and throughout the document track. Remove any staples, paperclips, debris etc. that might have accumulated during use. Using a can of compressed air will help keep the document track clean spraying from the back of the track to the front. 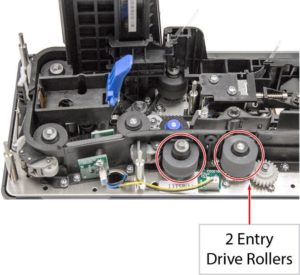
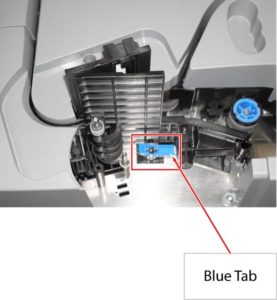
Inspect the quality of the captured images on a regular basis. If the image quality drops off or streaks appear on the images, clean the sensor glass. To clean the image sensor, use a Digital Check cleaning swab or a clean cloth to wipe the glass. Be careful not to scratch the glass when cleaning or accessing the image sensor for any reason. Also, make sure that the door to the sensor assembly is closed completely, by squeezing the blue tabs together until it has clicked completely closed. Not properly closing the door will lead to degradation of image quality.
 To clean the track rollers, use ScanLite to initiate a cleaning cycle and after removing the cleaning card from the pouch, hold it firmly allowing it to go about a half-inch into the track to scrub the two separator rollers for 4-5 seconds, then release the card and allow it to proceed through the track. Repeat the process four to five more times, flipping and rotating the card each time to expose a clean surface of the card each time. Then run the card through without holding it four more times, flipping and rotating it each time. When this is complete click the “Clean” button again in ScanLite to disengage the track rollers, dispose of the cleaning card, and wait 60 seconds for the rollers to dry before relaunching your application and resuming scanning.
For more information, please check the TS240 User Manual, pages 19-21.
TellerScan® TS500
The newest scanner in Digital Check’s TellerScan lineup is the TS500. This scanner is used primarily in Teller, Branch Back Counter, and Vault Capture environments. Being a batch-feed scanner, it too, like the TS240, requires regular maintenance to reduce jams, as well as to improve image quality and MICR read rates.
The TS500 has a built-in cleaning function that doesn’t require ScanLite to engage the feed rollers. However, it is just as important to 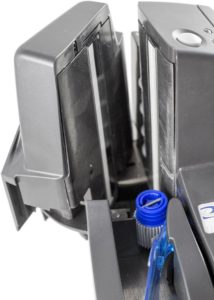 regularly inspect the feed track with a flashlight to remove any staples, paperclips, coins, rubber bands, or other foreign objects that may have dropped into the track. Additionally, it is important to use a can of compressed air to blow out the track from the back to front to remove paper dust that accumulates.
The image sensor door swings open allowing for easy access and cleaning. Use a cleaning swab or water dampened cloth to clean the lenses, making sure not to scratch them in the process.
 To clean the track rollers, simply push the power button three times in succession to initiate the cleaning cycle. The blue light on top of the scanner will flash quickly while in that cycle. Remove the cleaning card from its pouch and feed it into the track. The scanner will grab the card and hold it momentarily in the track allowing the feed rollers to scrub against and then release the card through the track. Repeat this four more times. Then push the power button again to stop the cleaning and dispose of the card. Wait 60 seconds to allow the rollers to dry before relaunching your scanning application to resume scanning.
For more information, please check the TS500 User Manual, pages 17-18.
BranchXpress® BX7200
The largest of Digital Check’s production scanners is the BX7200. With the ability to scan batches of up to 300 items, with two 300 item output pockets, and speeds of up to 200 documents per minute, the BX7200 is going to scan thousands of items in no time at all. That being said, maintenance will happen weekly at most and, in some cases, daily. Yet, Digital Check has made maintaining the BX7200 easy from a cleaning standpoint.
Again, it is important to perform regular maintenance of the BX7200 in order to reduce jams, as well as to improve image quality and MICR read rates. If any degradation in performance occurs, it is likely that the scanner requires cleaning. Begin by inspecting the document track for debris such as paperclips, staples, rubber bands, or bits of paper and remove any obstructions. Next blow out the track with compressed
air from the back of the track to the front.
 There are two separate image sensor assemblies in the BX7200, one for the front and the other for the rear image. Both can be opened for cleaning by removing the cover piece and opening the door. Use a cleaning swab or a water-dampened cloth to gently clean the lenses, avoiding scratching the lenses.
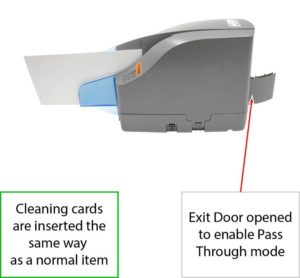
Next, use ScanLite and a Digital Check cleaning card and a cleaning swab to clean the track rollers. Open ScanLite and click the “Clean” button to engage the track rollers and open the swing-out door with the LCD panel to expose the rollers. Hold the card in the track allowing the feed rollers to scrub against them to clean them. Repeat this step 2-3 more times using different corners of the cleaning card each time.
Open the ‘Rear Door’ and locate the ‘Mid-path’ roller. The scanner motors will run and the rollers will turn normally with the ‘Rear Door’ 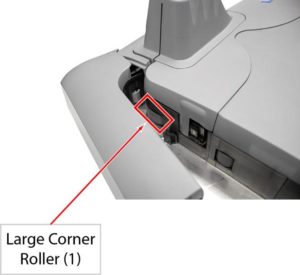
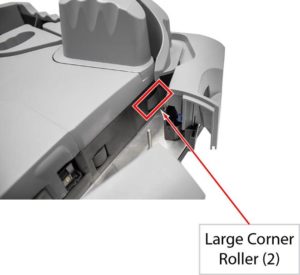 open. Press the cleaning card or cleaning swab against the ‘Mid-path’ roller for 3 seconds to scrub the roller clean. Then, locate the two ‘Large Corner’ rollers. With the scanner rollers still turning, press the cleaning card or cleaning swab against the 2 ‘Large Corner’ rollers for 3 seconds to scrub the rollers clean. Close the ‘Rear Door’ assembly, but keep the scanner running so that it is able to feed the cleaning card through as if it is a normal type of item.
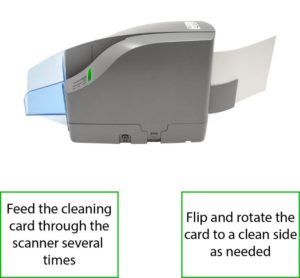
 Feed the cleaning card through around 6-8 times. Allow the card to scan all of the way through, flipping the card between cycles, top to bottom or to a clean side after each pass though the scanner. Discard the cleaning card(s) after use and allow 60 seconds for the rollers to dry before relaunching your scanning application.
For more information, please check the BX7200 User Manual, pages 26-28.
SmartSource® Professional and Expert Series
 The process for cleaning the SmartSource Professional and Expert series scanners is identical, as they are mechanically the same. Most of the time, a simple cleaning with a standard Digital Check cleaning card is all that’s needed to keep your device operating smoothly.
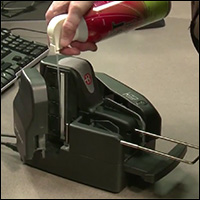
There is no special cleaning mode for the SmartSource Pro or Expert series; start by opening whichever program you use for scanning checks. Make sure it is in single-feed mode, and that ANY ENDORSING OR FRANKING OPTIONS ARE TURNED OFF! Running the inkjet printer during the cleaning process will ruin the card and spread ink all over the paper path and the image sensors.
 Run a new cleaning card through the track 4-6 times, flipping it end-to-end or top-to-bottom after each pass. Throw the used card in the trash after the process is complete; do not re-use old cards.
If a standard cleaning with a card is not sufficient, a detailed cleaning may be necessary. Power off and unplug the scanner, and remove the top and outer covers.
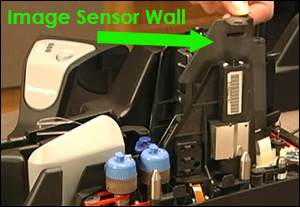
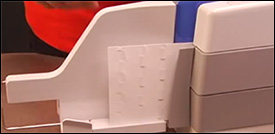
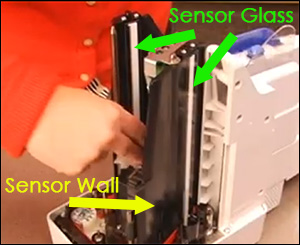
Carefully remove the front image sensor wall, franker roller (if installed), and the rear image sensor wall as shown. Remove any large debris such as staples or paper clips that may have fallen into the track, then blow the track out with compressed air.
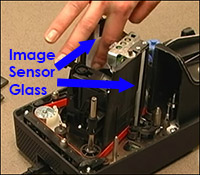 Especially if you have noticed dark streaks in your scanned images, you may need to wipe the image sensor glass as shown with an alcohol wipe. Clean both the front and rear sensor glass, and then wipe the sensor assembly walls immediately adjacent. Do not wipe the glass again after cleaning the assembly walls; this will re-introduce dirt to the image sensor.
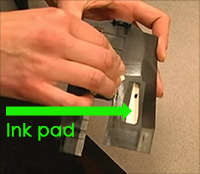
Finally, clean the front and rear sensor assembly walls that were removed, as shown, taking care not to wipe the ink pad in the center.
 Reinstall the parts in the reverse order you removed them, and you are ready to resume using the scanner.
For more information, see the SmartSource Professional Series user manual, or watch the video tutorial on the SmartSource Professional product support page.
SmartSource® Elite
 The SmartSource Elite series scanners should be cleaned periodically with a standard Digital Check cleaning card. Open your usual check deposit program and feed a new cleaning card through the track like you would with an ordinary check. Feed the card through 3-6 times, flipping it over after each pass. Make sure ANY INKJET ENDORSING OPTIONS ARE TURNED OFF! Running the inkjet printer during the cleaning process will ruin the card and spread ink all through the scanner track.
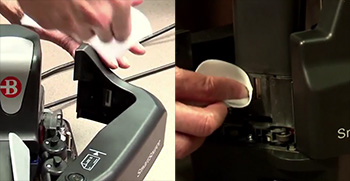
If a standard cleaning with a card is not sufficient, a detailed cleaning may be necessary. Power off and unplug the scanner, and pop open the outer covers, which swing out in a clockwise direction as shown. Remove any debris such as paper clips or staples, and blow out the paper path with compressed air.
Wipe down the front and rear image sensor glass with an alcohol wipe, then move on to the adjacent plastic sensor assembly walls – clean the glass first and then move on to the other parts.
 Lastly, wipe around the rear ink pad and the endorser with a cleaning pad, taking care not to rub the pad or the inkjet nozzle itself. Do this step last and throw away the cleaning pad afterward. Snap the covers shut, power the scanner back on, and resume normal operation.
The cleaning procedure for the Expert Elite series is identical to that for the Elite series, as the devices are mechanically the same. For more information, see the SmartSource Elite Series user manual, or watch the video tutorial on the Elite series product support page.
SmartSource® Micro Elite
 The SmartSource Micro Elite generally requires cleaning only occasionally, on an as-needed basis. Usually, only a basic cleaning with a cleaning card is needed. Open your normal check deposit program and feed a cleaning card through 3-6 times, like you would with an ordinary check. Flip the cleaning card over after each pass. Make sure any inkjet endorsing options are tuned off!
A detailed cleaning is necessary only if you are noticing performance issues with your scanner, such as a high number of read errors, or horizontal black streaks across your check images. The scanner’s image sensor assembly door snaps open easily as shown; wipe the glass and adjacent plastic walls free of dirt and debris with an alcohol wipe. Be sure to wipe the glass first with a clean alcohol wipe, then move on to the other parts.
For more information, see the SmartSource Micro Elite user manual, or watch the video tutorial on the Micro Elite support page.
SmartSource® Adaptive
 It is recommended that you periodically perform a basic cleaning on the SmartSource Adaptive scanner using a Digital Check cleaning card. Open your usual check deposit program and feed a new cleaning card through the track like you would with an ordinary check. Feed the card through 3-6 times, flipping it over after each pass. Make sure any Inkjet endorsing functions are turned off.
A standard-sized cleaning card is sufficient for the Adaptive despite its larger size, as most dirt and debris collects on the rollers and lower part of the track. If the image sensor is dirty (typically evidenced by horizontal black streaks in the images), use the detailed cleaning steps listed below.
 Unplug the device and remove the outer and top covers. Take out the removable front and rear sensor assembly walls, and remove the franker roller if your scanner is equipped with one.
Remove any large debris such as staples or paper clips from the track, then blow the track out with compressed air. Start at the input (feed) pocket and work your way around to the exit tray.
 Wipe the image sensor glass with an alcohol wipe as shown, then wipe the adjacent sensor assembly walls and the removable walls that you took out earlier. Do not wipe the glass again after wiping the other parts. Take care not to wipe the inkjet printer or rear ink collection pad in the process.
When you are done, reassemble the parts in reverse order and turn the machine on to resume normal operation.
For more information, please see the user manual or video instructions on the SmartSource Adaptive support page.