Today’s question comes from a customer in New York, who asks:
“What should I do if someone gives me a check that’s torn at the bottom? Is it OK to run through the scanner?”
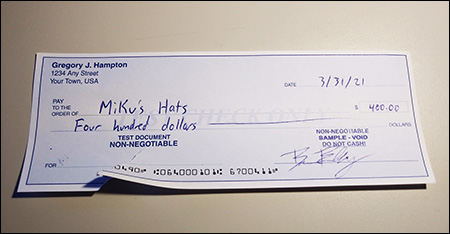
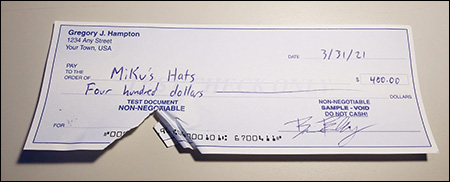
The short answer is no – you probably shouldn’t, if the damage is significant, as shown in the example at right. Check scanners can tolerate small imperfections, but as with any mechanical process, 90% of the problems tend to come from the worst 1% of the input.
A good rule to go by is: If a tear is big enough for you to notice, it’s probably a good idea to set that check aside and handle it differently, as we’ll explain below.
The second-worst thing you can do with a badly damaged check is to just scan it through like normal.
The absolute worst idea would be to fasten it back together with a staple, or to try stapling it to another piece of paper. Not only would the staples be attracted to the magnets in the MICR read head, but anything metal in the track can easily scratch the camera glass. Fortunately, we have almost never heard of anyone doing this. Please don’t be the first.
Anyway, when you have a torn check, why is it a bad idea to just give it a try? Well, you might get a paper jam, which is a nuisance, but not the end of the world. That’s not the real concern, though. What you really don’t want is for the tear to get worse.
The main thing you’re trying to avoid with damaged checks is this:
When a check goes through the track, the scanner’s rollers and/or drive belt grip it from the bottom. If you have an unfortunately aligned tear, the rollers will “pinch” it and roll it up, ruining the document completely.
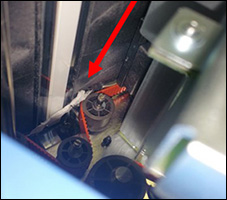
Also, when this happens, it’s not unusual for pieces of paper to be torn off entirely, and become stuck in the bottom of the track. That will cause paper jams to happen repeatedly – not just for the damaged item, but for other checks you try to scan later. These missing scraps can be very difficult to find, and even more difficult to remove. Often times, you won’t even notice them, except of course for the ever-more frequent paper jams.
Ideally, use a document carrier
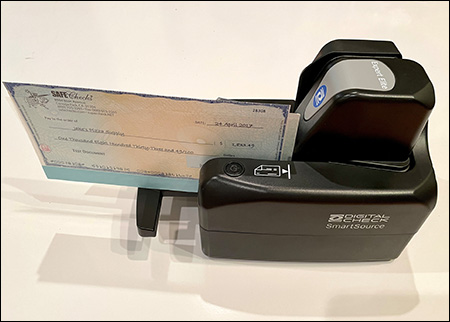
These are essentially clear plastic sleeves that give the rollers a smooth, unbroken surface to grip, while still allowing light to pass through so the image sensor can do its job. Digital Check doesn’t sell document carriers, but they are available from certain bank and business suppliers.The one drawback of a document carrier is that it raises the check approximately an inch off the floor of the paper path, so it misses the MICR reader and none of the magnetic data is captured. You will likely have to manually enter the MICR data, such as the account number and/or the routing number.
Interestingly, many years ago, before desktop scanners and image-based clearing were in use, check processing equipment used to encode the amount of each check on the front prior to processing. Damaged checks were still inserted into these document carriers, but in a special “read high, encode low” mode. That meant the machine would look for the magnetic ink at the raised height, then encode the MICR information on the bottom of the envelope itself at the normal height. Then the damaged check would be run through again, envelope and all, in normal mode. This required a machine with two MICR heads, one at the normal height and one at the raised height.
Next best: Scan a photocopy of the damaged check
Let’s face it – document carriers are not the most common thing in the world, and you probably don’t have one just laying around. If you don’t, the other “recommended” solution is to make a photocopy of the damaged check and try to scan that instead.
It’s best if you can use an office copier or a laser printer for this, and here’s why: The toner used by these devices is slightly magnetic, about 20 percent as strong as the ink used for MICR printing.
Normally, banks and scanner manufacturers hate this, because when people print their own checks on a laser printer, the weak magnetic signal is hard to read. In this case, though, 20 percent is better than zero percent. It may be the one way to actually pick up the MICR line from a damaged check by scanning (though at 20 percent, it’s still best to verify the information manually).
Of course, this method has its drawbacks, particularly if the check had a “VOID” or “NON-NEGOTIABLE” pantograph printed in the background. Modern scanners are sometimes good enough to “read around” this, but sometimes the interference can be too much to resolve a useable image. Also, if you’re a bank using this method to process checks internally, you are probably aware of the reason why it happened … but if you’re a business trying to deposit that check, your bank may have questions about why the image has a big “VOID” on it.
Other methods – some clever, some not so much (use at your own risk)
One trick that some users have occasionally employed is to turn the check upside down when there are problems on the bottom edge. The original use of this was for checks that had unreadable MICR lines that were generating errors; turning the check upside-down got the magnetic ink out of the way of the MICR head, so that it scanned normally. The check scanner is “smart” enough to flip the image back right-side up, but none of the magnetic information is captured.This same trick can sometimes work for small tears on the bottom, so that the tear clears the top of the rollers. However, be aware that no magnetic information will be captured, and you should verify it manually.
Occasionally, we have heard of users who have repaired a damaged check by (carefully) taping it back together, or even using a glue stick to affix it to a second piece of paper. We cannot recommend this – while it may work in the immediate short term, it is never a good idea to put glue or anything sticky through the paper path, where it may rub off on the rollers or other important parts. If the tear in the paper goes through the MICR line at the bottom, using tape or glue also may not line it back up exactly, leading to the potential for MICR misreads or can’t-reads.
The orientation of the damage matters
Keep in mind that the size, position, and direction of the tear do make a difference. In general, small tears at the top of a check are usually just fine. (This is the most common place for a check to be damaged, when it is torn out of a checkbook.) Also, for larger tears, or for tears where the “flag” of the tear faces forward, it may get caught in the paper track anyway, so be careful.
Tears on the bottom are worse than tears on the top, since that’s the part that feeds through the rollers or belt. Likewise, damage on the leading edge of the document (the part that feeds through first) is much more problematic than damage on the trailing edge. However, in some cases, such as when a feed-and-return scanner like the CheXpress CX30 is used, trailing-edge damage can be just as bad.
In general, just remember: When in doubt, don’t just put a torn check through! Try one of the other methods first.
Did you know? Some extra trivia about check and document carriers
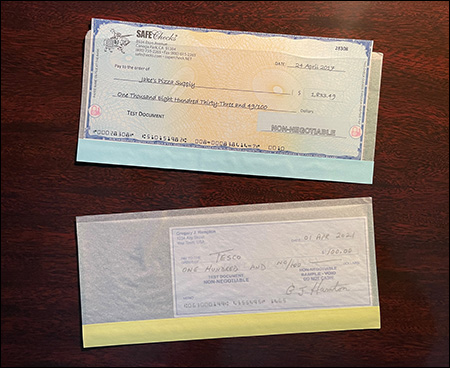
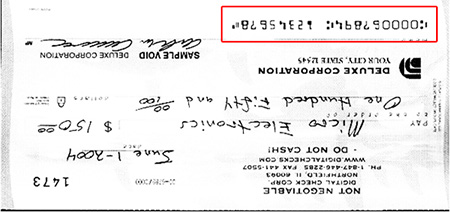
Check carriers have been around for a long time, and over the years, they’ve evolved into several different formats. Originally, they were made out of glassine paper on both the front and back sides. If you’re not familiar with the term “glassine,” it’s a type of smooth translucent paper, whose texture and thickness is about midway between wax paper and tissue paper. You might see it used in envelopes, bags, or sometimes as origami paper.As you can see in the photo at right, glassine paper is only partly transparent, so it’s not the best choice if you’re trying to capture an image of the check. Why was it used, then? Well, even though checks have been mechanically scanned and sorted for decades, images of checks weren’t used in the clearing process until relatively recently. The most important thing was to capture the magnetic MICR data at the bottom, and glassine paper didn’t interfere with that. And its semi-opaque properties were actually an advantage if you needed to print something on the carrier – MICR encoding on the front, or an endorsement on the back.
Later, as countries switched to image-based clearing, the image of the check naturally became the most important element of the process. Glassine paper could cause a low-quality scan, and so carriers with a transparent plastic front became popular. It was still standard for glassine to be used on the back, though, so that endorsements would be easily legible. Carriers with both a transparent plastic front and back are also made, although these are not as widely used, since printing endorsements on the plastic back is not desirable.
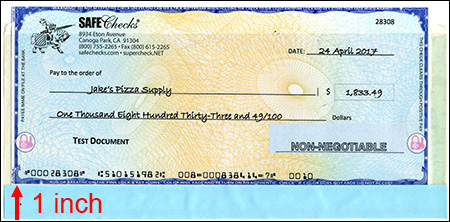
Some application software provides the capability to handle documents in carriers by attempting to recognize the MICR codeline optically from the original check image – which is now shown in the carrier envelope but approximately 1 inch higher due to the carrier itself.In the old days, when the original paper checks were still physically exchanged between banks during the final settlement process, the MICR encoding on the front of the carrier, and the endorsement on the back, were a necessary part of the process for the receiving bank. And so, each carrier was for one-time use only, and accompanied the check for its entire trip. Way back when banks were required to return the canceled paper checks to customers, you might occasionally have even found a check with a carrier inside your monthly statement.
Today, original paper checks are rarely exchanged between banks, and so the only real purpose of a carrier is to keep torn checks from jamming the machine. MICR encoding is not done on the front, and endorsement on the back is at the discretion of the bank that received the check. This could have interesting implications, for example, if a carrier was used in a remote deposit capture transaction – since the endorsement would not be printed on the check itself, in theory, it could lead to a duplicate deposit. While the use of a check carrier in RDC is still a relatively niche occurrence, it’s recommended that banks have some form of policy in place requiring a physical endorsement on the check itself in these cases. Under the Reg CC updates that took effect in 2018, this is one situation that could otherwise leave a financial institution on the hook if a duplicate deposit occurred. It’s always better to be safe than sorry!